
DNS techniques
By Ed Neville
Introduction
This guide shall show how to setup djbdns for a SOHO environment.
Named/BIND (Berkeley Internet Name Daemon) is a popular DNS (Domain Name System) server, but perhaps it has had a few general problems.
With a default installation of 'named', you leave yourself open to proxy for anyone on the Internet to make DNS queries through your open system, which is a caching nameserver on all interfaces.[1] I have found of late that DJB's DNS suite of tools to be of great efficiency and use.
Despite its merits, there is one major drawback: you cannot run a DNS server and a DNS cache in the same instance on the same interface. Some might see this to be both confusing and irritating; I see this as security. I run a typical SOHO setup: I have a handful of domain names and a handful of computers on the LAN. This is how I run things here, and that is the basis for this article.
To illustrate the network layout:
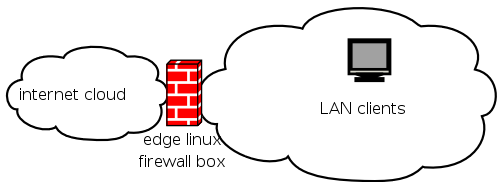
In this example, you need to decide whether to put the DNS server in your LAN or if you have it at the firewall. DNS lookups (should) create little load on your network, so it's not necessary to set up a dedicated box. If you do choose to set up a dedicated box, then it will probably sit idle for most of the time, in which case you might want to make it double up as a backup server; therefore, you should not be short of disk space, here.
In my example, the Internet cloud is attached to a 35.45.55.65 IP address, and the LAN clients are on a 192.168.0.0-255 network (otherwise known as a 192.168.0.0/24 RFC 1918 private network).
The plan here is to set up 'tinydns' to serve our UDP DNS lookups, 'dnscache' to serve the LAN with a DNS cache's lookups, and a private 'tinydns' server to respond with NXDOMAIN [2] on lookups from which potentially bad Internet traffic might result.
Getting Required Parts
One of the instant hurdles for anyone who has not done source installations is that the entire suite of programs DJB provides is in source code. The code is very well written, and compiles just fine on most systems, but his licence does not permit his software to be redistributed if altered. Because of this, most distributions cannot provide binary packages.
There are three main parts to getting up and running with DJB's DNS packages:
daemontools
http://cr.yp.to/daemontools/daemontools-0.76.tar.gz provides a suite of programs for managing system services. The bulk of the suite is supervisory programs, which consist of a super service and monitoring utilities. This is what will keep the DNS services running: even in the event of a program crash, the super service will restart things for us.
ucspi-tcp
'ucspi' provides TCP server and client programs that allow callers to talk TCP through stdin/stdout-like read/writes. This cuts out a large security risk that the callers would otherwise have to code against (such as some basic buffer overflows).
djbdns
http://cr.yp.to/djbdns/djbdns-1.05.tar.gz is the suite of DNS programs and libraries that provide the DNS information to queries.
We'll put daemontools in the /package directory, the super service directory will be /service, ucspi tools will go into /usr/local, and the DNS programs will have their configuration in /etc.
[ The locations of the two directories suggested above, '/service' and '/package', are not compliant with either FSSTND or FHS standards, as far as I'm aware; placing these subdirectories somewhere other than the root directory (e.g., "/opt" is reserved for this purpose under the FHS) may be advisable. -- Ben ]
Installing Daemontools
Following the basic setup directions from DJB's pages:
mkdir -p /package
chmod 1755 /package
cd /package
wget http://cr.yp.to/daemontools/daemontools-0.76.tar.gz
tar zxpf daemontools-0.76.tar.gz
cd admin/daemontools-0.76
The compilation and installation is taken care of via a single
command, package/install.
We should now have supervise running from /etc/inittab, if not, run 'svscan &' manually.
Installing ucspi-tcp
As with daemon-tools, we shall follow the DJB notes for installation.
cd ~
wget http://cr.yp.to/ucspi-tcp/ucspi-tcp-0.88.tar.gz
tar zxpf ucspi-tcp-0.88.tar.gz
cd ucspi-tcp-0.88
Compile the ucspi-tcp programs by typing 'make'; As root, install the ucspi-tcp programs under '/usr/local' with 'make setup check'.
djbdns
cd ~
wget http://cr.yp.to/djbdns/djbdns-1.05.tar.gz
tar zxpf djbdns-1.05.tar.gz
cd djbdns-1.05
echo gcc -O2 -include /usr/include/errno.h > conf-cc
make
There is a slight bug with compiling, after some recent changes
with glibc; hence, the fifth line in the above code block
replaces the original compilation options. Once this is complete, we can
get on with configuring the system.
Configuring the DNS Cache
We need to create a new user account for 'dnscache', so it can run as that user, since running services as root invites a host of security problems. The same reasoning applies for setting up the groups.
groupadd dnscache
groupadd dnslog
useradd -g dnscache dnscache
useradd -g dnslog dnslog
Now, let's set up the cache directory:
dnscache-conf dnscache dnslog /etc/dnscache
Choose an IP for the DNS cache to listen on, and write it into "/etc/dnscache/env/IP". In my case, I have the private IP address 192.168.0.1 on my firewall's LAN interface, so I place this IP address here:
echo 192.168.0.1 > /etc/dnscache/env/IP
Next, we'll add a setting to tell 'dnscache' which source IP addresses to service; we do this by 'touch'ing the IP ranges in /etc/dnscache/root/ip/:
touch /etc/dnscache/root/ip/192.168.0
The next step would be to link this directory into the super-service directory, but we shall get to that in a moment.
Configuring the DNS Server
The DNS server and DNS cache cannot operate on the same interface using the same protocol. BIND can do this; however, this is not desirable default behavior. BIND suffered for a long time from being exploited by people who shifted the lookup work onto third-party daemons.
'tinydns', in my example above, is set to operate on 35.45.55.65, serving the contents of my DNS datafile only. If the answer that the client wants is not in the datafile, then the lookup fails.
groupadd tinydns
useradd -g tinydns tinydns
tinydns-conf tinydns dnslog /etc/tinydns 35.45.55.65
We should now have a tinydns directory in /etc/tinydns. Let's make sure it's set to listen on the correct IP address by inspecting the contents of "/etc/tinydns/env/IP", which should hold your desired DNS-serving IP address. In my case, this is 35.45.55.65.
data.cdb
'tinydns' uses a hash database lookup file. This makes query lookups extremely fast and efficient. The hash file is stored in CDB format. This file can be transported to any architecture and it will remain compatible; this makes DNS clusters very easy to maintain.
In /etc/tinydns/root/, there is a data file and a Makefile. When the Makefile is run, the file 'data.cdb' is created. DNS zones contain (among other items) A(+), MX(@), NS(&), Zones(Z), and Cnames(C).
A Records
Let's take a look at the simplest, the A record:
+example.com:35.45.55.65:86400
Above, we set the A record of the host example.com to the IP address 35.45.55.65 with a TTL (Time To Live) of one day in seconds.
CNAME Records
CNAME records are similar; they are pointers to an address record. The problem with address records is that, when the IP address changes, often the DNS administrator has to re-jig many address records, often at the same time as the IP address is altered. CNAMEs are a way to reference A records. The only problem with a CNAME is that it causes two lookups rather than just the one lookup; this obviously affects you if bandwidth and time is short. [3]
Cwww.example.com:example.com.:60
The above shows the hostname www.example.com points to example.com with a TTL of 1 minute. Please note the trailing '.' at the end of the host target.
Mailer Records
MX records differ slightly from CNAME ones because they must also contain the mailer preference.
@example.com::mail.example.com.:10:86400
Here we see that the MX, for example, points to the A record of example.com with a preference of 10. Please note the trailing '.' after the address target. Also note that it is often a bad idea to specify a CNAME as the mailer target. Putting a CNAME here does not gain you anything, other than having three lookups rather than two each time an MX lookup is performed. [4]
Nameserver Records
When organising DNS for your domain, it is important that the Name Server (NS) records at your domain's DNS server match the root's NS list.
&example.com::ns0.example.com.:86400
Above, we specify that the NS for example.com is the address record ns0.example.com. Please note the trailing '.'!
Zone Records
The zone record also contains information other than records; mainly, this provides zone update details. Here, one must specify the SOA (start of authority), which in most cases is your primary nameserver, so secondary name servers know where to find updated information.
Zexample.com:ns0.example.com.:hostmaster.example.com.:2005090312:7200:7200:2419200:604800
The above states that the zone name is example.com, with the primary name server of ns0.example.com. The hostmaster email address is hostmaster@example.com. The first '.' is assumed as an @.
We use the date in 'YYYYMMDDHH' format as the serial number for the zone [5]. These values are specified in seconds and are (in order from left to right):
-
refresh
-
retry
-
expire
-
minimum refresh
We now have a basic setup. The full zone layout is as follows:
Zexample.com:ns0.example.com.:hostmaster.example.com.:2005090312:7200:7200:2419200:604800
&example.com::ns0.example.com.:86400
@example.com::mail.example.com.:10:86400
Cwww.example.com:example.com.:60
+example.com:35.45.55.65:86400
+mail.example.com:35.45.55.65:86400
+ns0.example.com:35.45.55.65:86400
Once you have written your zonefile, you should run the make program to build this into the 'data.cdb', as mentioned above.
For full documentation on the format of the datafile, you might want to visit http://cr.yp.to/djbdns/tinydns-data.html.
Starting the Services
Once happy with the configuration, we can start the services by linking them both to the /service directory. To do this, just issue the following two commands:
ln -s /etc/tinydns /service
ln -s /etc/dnscache /service
Wait for a few seconds, then issue 'ps -aux'; you should see output similar to the following:
root      2241  0.0  0.0  1276   256 ?        S    Jul27   0:00 supervise dnscache
root      2250  0.0  0.0  1276   256 ?        S    Jul27   0:00 supervise tinydns
dnscache  2252  0.0  0.1  2860  1588 ?        S    Jul27   7:02 /usr/local/bin/dnscache
dnslog    2254  0.0  0.1  1416   328 ?        S    Jul27   0:42 multilog t ./main
tinydns   2265  0.0  0.0  1532   320 ?        S    Jul27   0:31 /usr/local/bin/tinydns
dnslog    2272  0.0  0.0  1416   328 ?        S    Jul27   0:10 multilog t ./main
If you do not see the above, then it might be that your 'supervise' program is not running. You should ensure that your '/etc/inittab' file contains this line:
SV:123456:respawn:/services/svscanboot
Then, send init a HUP signal:
kill -HUP 1
Then, check that 'supervise' actually starts. If not, there will be a message about the failure against the 'readproctile' process in your 'ps' output.
Logging
It is now important to check the status of the processes that are running; we can do this through the multilog output, which is located in '/etc/tinydns/log/main/current' and '/etc/dnscache/log/main/current'.
The best way to watch these files is with the following command (from the log directory):
tail -F current
As these files can be rotated frequently, using the '-F' parameter will cause the 'tail' program to watch for file changes and reposition the file pointer at the beginning of the file at log rotation time.
We should see the following output (for tinydns):
@4000000044e38ce704a37e0c starting tinydns
and the following for dnscache:
@4000000044e38d0f165dc2ec starting
If you see errors, then you might have to go through the above installation instructions, checking that everything has been followed correctly. If you see output, then this is even better, since it means your programs are working (one hopes) as expected.
Testing
To test that the DNS cache is operating correctly, you can type the following:
nslookup – 192.168.0.1
set q=mx
yahoo.com
The line 'set q=mx' tells nslookup to make MX queries, which will return Yahoo's mail servers:
yahoo.com mail exchanger = 1 mx2.mail.yahoo.com.
yahoo.com mail exchanger = 1 mx3.mail.yahoo.com.
yahoo.com mail exchanger = 5 mx4.mail.yahoo.com.
yahoo.com mail exchanger = 1 mx1.mail.yahoo.com.
To test that the the DNS server is running correctly, we can do the following:
nslookup – 35.45.55.65
set q=mx
example.com
There are other tools you might like to use for DNS debugging, named 'host' and 'dig': these are very powerful and are great fun for scripting.[5] If you happen to know how to program in Perl, you might like to get the Perl module Net::DNS, which provides a wealth of DNS lookup functions.
DNS Poisoning
DNS poisoning is the method in which we taint results to suit the query. For example, if you were to discover an Internet shock site, you could prevent lookups of this site by telling the DNS cache to use a given DNS server for all these queries. The DNS server in this case would be set to respond with NXDOMAIN for every lookup; thus we can send any query we like there and we know it is always going to give the same result, NXDOMAIN. This is the ideal result, as the lookup does not wait around for a timeout.
In the /etc/dnscache/root/servers/ directory, you can place the IP address of the poisoned server in the file matching the domain name you want poisoned. For example, inside /etc/dnscache/root/servers/doubleclick.net, I have 127.0.0.7.
Setting up the Forge Server
We're going to repeat the setup above for the 'tinydns' server, but with the small exception of the datafile and its installation location.
tinydns-conf tinydns dnslog /etc/tinyforge
cd /etc/tinyforge/root
echo '.:' > data
This line in the data file affects all lookups.
make
echo '127.0.0.7' > /etc/tinyforge/env/IP
The above line tells 'tinyforge' which IP address to listen on.
We must setup a local interface for tinyforge to bind to:
ifconfig lo:1 127.0.0.7
(You will need to add this to your system configuration.)
ln -s /etc/tinyforge /service
And now, we start the service by linking it in the /service directory; you might want to repeat the testing above, to verify that lookups are correctly returning NXDOMAIN.
When you execute 'svc -h /service/dnscache', the servers directory will be reloaded, and specified domains will be forwarded to the DNS forge server.
Further Setup
There is a project at http://www.bleedingsnort.com/blackhole-dns/files/ where a list of inappropriate sites is maintained. This can be easily scripted into a directory of DNS servers. The script is not included here, as the file layout is subject to change.
If you're like me, you will want statistics of which domains are looked up on your tinydns server most frequently: You can get this information quite easily from '/etc/tinydns/log/main/'. I suggest reading this periodically via a Perl script and feeding the information into a normalised MySQL database.
Performance
There are many advantages to having all the DNS settings in a single file. In my case, this single file is generated from a database, which I shall not go into here, but this allows friends or customers to make changes via a Web interface.
With BIND, the zones are stored in single files. If you were to have a huge number of files in a single directory, the OS would have to open the directory at reload time for processing. This could take some time if you had a large number of zone files.[7] This might seem trivial, perhaps, but, if your business is to provide DNS, you might want to schedule your reloads rather than allow customers to queue up reloads.
The single data hash file is very effective. During the make process, the datafile is named 'data.cdb.tmp' until the build is complete, then renamed to 'data.cdb'. This allows datafile creation without interruption to the running tinydns server.
[1] Rick Moen adds: The point is valuable and well taken. If using BIND9, Rob Thomas's "Secure BIND Template" is a far better starting point than the normal BIND9 configuration, and among many other improvements use the "view" partitioning scheme to limit recursive-DNS accees to specified more-trusted-network IPs, only.
[2] RM: This DNS return-value string is short for "no such domain".
[3] RM: There's one other very serious problem with CNAMEs: They may not be used to define a hostname that is also used for an NS, MX, or any other DNS record (see: RFC1912 2.4 and RFC2181 10.3).
New DNS admins almost always vastly overuse CNAMEs: The reason appears to be lack of awareness of the performance hit from that second lookup and of the RFC restrictions, combined with uncertainty about whether multiple "A" records pointing to a single IP are OK. The latter is almost always, in fact, the right solution, except where pointing to an out-of-domain FQDN (fully-qualified domain name). Yes, CNAMEs are faster to re-point when/if IPs change, but that's what search and replace is for.
[4] RM: Because of the RFC's prohibition of same, they may also get your domain's outbound mail refused.
[5] RM: If working on zonefiles with other system administrators, you will find that S/Ns of the form YYYYMMDDnn (where nn starts at "00") predominate, and are nearly an industry standard -- permitting as they do 99 zonefile changes per day. In any event, never put yourself in a situation where you'll wish to edit to a numerically lower S/N, as troublesome footwork is required if it's ever necessary to propagate such a change to secondaries that normally act only on S/N increases.
[6] RM: In fact, use of the venerable if somewhat dotty 'nslookup' tool is now deprecated is favour of 'dig' and 'host'. There are a number of reasons for this, and they are comprehensively (if with a certain savage joy) catalogued by knowledgeable djbdns fancier Jonathan deBoyne Pollard, here: http://homepages.tesco.net/J.deBoynePollard/FGA/nslookup-flaws.html Fortunately, 'dig' and 'host' are really good tools, and you'll be glad (eventually) to have rid yourself of the nslookup habit.
[7] RM: Someone using BIND9 for primary nameservice on 5,000 zones would actually probably use the BIND DLZ (BIND Dynamically Loadable Zones, http://bind-dlz.sourceforge.net/ variant, or the "LDAP sdb" patch (http://www.venaas.no/ldap/bind-sdb/) against BIND9, both of which back-end BIND9 into a SQL database instead of its default flatfile storage. However, large sites might prefer specialised and higher-performance primary-nameserver packages such as NSD (http://www.nlnetlabs.nl/nsd/), MyDNS (http://mydns.bboy.net/), or PowerDNS (http://www.powerdns.com/products/powerdns/) -- all likewise open source.
I have all known choices for Linux catalogued in my knowledgebase at "DNS Servers" on http://linuxmafia.com/kb/Network_Other/.
Talkback: Discuss this article with The Answer Gang
![[BIO]](../gx/authors/neville.jpg)
Born: 1980 Reading, UK. Graduated from Reading College with BSc (Hons) Computing with Internet Technologies. Favourite programming languages, perl, c, php, java. Became interested in Linux around 1997, worked professionally with linux since 2001 with Debian. Often responsible for corporate network design. In spare time Ed likes to spend time in the gym, learning Russian, helps users on many linux/programming mail lists and researching the linux kernel. Ed prefers to live healthy.
